Custom Umbraco Property Editor Tutorial: Character Counts

Today we will create a custom Umbraco Property Editor. This custom property editor adds a character counter to a Textstring or Textbox field. As you type, the character counter will countdown from the max value (we’ll assign that) to 0. Once it reaches 0, it will prevent any further entry. We found this to be most useful when setting up our SEO Metadata Document Type since it houses a few properties we needed to limit the character count on.
I’ve added a coloring convention to this blog post & I will try to follow it throughout my Umbraco related tutorials. Data Types will be in orange & Document Types will be in green.
You can skip all of this and just download the source on GitHub, if you like.
Before we go any further:
- Yes - you can add a description for your content authors to “please only type 50 characters”. And I recommend you still do!
- Yes - you can add a regular expression to limit the amount of characters typed into the field. And I recommend you still do this too! Where I feel Umbraco falls short is in the experience for the content author. When a regex is entered for validation there is barely any feedback given to the user why what they have entered is wrong. And the validation is re-active instead of pro-active. It only updates after the user has entered in bad data. The solution: a custom data type that provides immediate feedback to the content author! And it will be configured to use the property editor we are making today.
So let’s create our custom property editor.
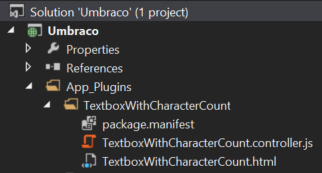
Under the ”App_Plugins” folder create a new folder to house our new files. I created a folder called ”TextboxWithCharacterCount”. I find it easier to reuse the name for the folder, files, controllers, etc but it doesn’t matter what you call them!
You’ll need to create 3 files in the folder you just created:
- A Package Manifest
- I named this ”package.manifest”
- An HTML Template
- I named this ”TextboxWithCharacterCount.html”
- An Angular Controller
- I named this ”TextboxWithCharacterCount.controller.js”
The Package Manifest
The package manifest will be the first file you create. This file describes our plugin and provides instructions to Umbraco on what files to load. For more information on this step, see ”Creating a Property Editor“.
Important: The ”alias” property must be unique in your environment, and anyone who uses your code in their own Umbraco environment. For that reason, I prefix the alias with “Scylla.” creating an artificial namespace for all the plugins we create in-house. Prefix yours with something that makes it unique.
Not so Important: The ”name” property is the public-facing label Umbraco will use. This does not have to be unique and allows us to give our plugin a more friendly name.
Here is our package manifest:
| { | |
| propertyEditors: [{ | |
| alias: "Scylla.TextboxWithCharacterCount", | |
| name: "Textbox with Character Count", | |
| editor: { | |
| view: "~/App_Plugins/TextboxWithCharacterCount/TextboxWithCharacterCount.html" | |
| }, | |
| prevalues: { | |
| fields: [{ | |
| label: "Maximum", | |
| description: "Maximum number of characters for validation.", | |
| key: "maxCount", | |
| view: "number" | |
| }] | |
| }, | |
| }], | |
| javascript: [ | |
| '~/App_Plugins/TextboxWithCharacterCount/TextboxWithCharacterCount.controller.js' | |
| ] | |
| } |
The HTML Template & The Angular Controller
These two files work together to provide the interface. If you don’t know anything about Angular don’t fret - I’m pretty new to it too. What we are doing here is writing an Angular Controller, to interact with our HTML and provide back to Umbraco a value in the form of a JavaScript variable.
Again, looking at ”Creating a Property Editor” may give more insight. The page lists a couple of resources for learning Angular too:
Here is our HTML File:
| <div ng-controller="Scylla.TextboxWithCharacterCount" id="Scylla_TextboxWithCharacterCount"> | |
| <input ng-model="model.value" | |
| ng-change="update()" | |
| class="umb-editor umb-Textbox Textbox" | |
| type="text" /><br /> | |
| <small ng-class="model.className">{{model.remainingCount}} chars remaining</small> | |
| </div> | |
| <style> | |
| #Scylla_TextboxWithCharacterCount | |
| .red { | |
| color: red; | |
| } | |
| #Scylla_TextboxWithCharacterCount | |
| .yellow { | |
| color: yellow; | |
| } | |
| #Scylla_TextboxWithCharacterCount | |
| .orange { | |
| color: orange; | |
| } | |
| #Scylla_TextboxWithCharacterCount | |
| .green { | |
| color: green; | |
| } | |
| </style> |
And here is our Angular Controller:
| angular.module("umbraco").controller("Scylla.TextboxWithCharacterCount", function ($scope) | |
| { | |
| // Loads Default Max Count | |
| $scope.model.maxCount = $scope.model.config.maxCount; | |
| // Attempts to re-define Max Count by description text | |
| if ($scope.model.description) | |
| { | |
| var maxSetInDescription = $scope.model.description.match(/\d+/); | |
| if (maxSetInDescription) | |
| { | |
| var newMax = parseInt(maxSetInDescription[0]); | |
| if (newMax > 0) | |
| $scope.model.maxCount = $scope.model.description.match(/\d+/)[0]; | |
| } | |
| } | |
| // Calculate a low and medium range so we can set the CSS appropriately | |
| var low = Math.ceil($scope.model.maxCount * 0.25); | |
| var med = Math.ceil($scope.model.maxCount * 0.5); | |
| // Called when changes are detected within the textbox | |
| $scope.update = function() | |
| { | |
| // Calculate the remaining characters | |
| $scope.model.remainingCount = $scope.model.maxCount - $scope.model.value.length | |
| // Is our maximum limit reached? | |
| if ($scope.model.remainingCount <= 0) | |
| { | |
| $scope.model.remainingCount = 0; | |
| $scope.model.value = $scope.model.value.substr(0, $scope.model.maxCount) | |
| return; | |
| } | |
| // Set the correct CSS class | |
| if ($scope.model.remainingCount <= low) | |
| $scope.model.className = "red"; | |
| else if ($scope.model.remainingCount <= med) | |
| $scope.model.className = "orange"; | |
| else | |
| $scope.model.className = "green"; | |
| } | |
| // Run the update method at start | |
| $scope.update(); | |
| }); |
Now we can put it to use!
Your file structure should look something like this:

Note that after uploading these files to your web server, you may need to recycle it for Umbraco to pick up the changes. I didn’t have to - a hard refresh in my browser window loaded our new property editor just fine.
Create Your Data Type
- Log into the Umbraco Back Office and load your “Developer” section.
- Right click “Data Types” to create a new one.
- Give it a name: “Textbox with Character Count”.
- Set the property editor to: “Textbox with Character Count”.
- If you do not see your property editor I would recycle the site in IIS, if it’s still not available I would verify the 3 files have the exact code displayed above.
- Enter a Maximum value - this dictates how many characters you can type into the input field.
- Not sure how many characters you want to limit it to? Don’t worry - this is used as a default value. It can be overridden later.
Add The Data Type to a Document Type
This is easy enough - find the document type you want to use this field in and add new property. For the type you’ll want to choose our new data type Textbox with Character Count.
Important: You can also update any existing property to use this field. Just remember that whatever data is stored in the field already will be truncated next time you go to edit it.
But we don’t always want the same character limit! How can we change this?
One step ahead of you! I’ve built in an override capability into the Angular Controller. It’s really easy to use, but it relies on a regular expression.
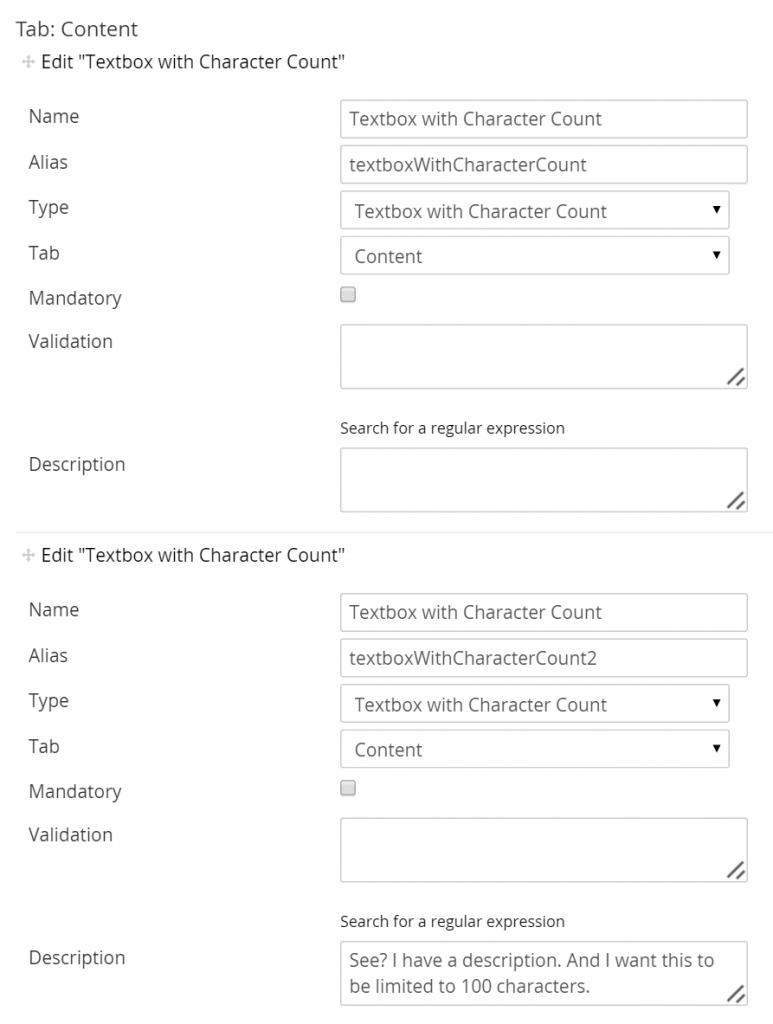
When we created the data type we set a default maximum value. Instead of creating various data types for everyone character amount we want, I’ve decided to read the description field and if a number is found, this number will override the default value. Pretty simple!
Here is an example. In the screenshot you’ll see two properties I’ve defined. They both use Textbox with Character Count, but one has the Description filled out.

Now when I go to edit my content - the two properties will have different max values set.

Thanks!
Please share your thoughts & comments below. I try to read and respond to as many as I can. And if you would like to contribute or raise an issue with the code then visit the Gist on GitHub.